Thursday, February 19, 2015

Parts of an instrument


Parts of an instrument
Copyright 2013 Wolfers Kluwer Health | Lippincott Williams & Wilkins

All Dental hand instruments, be it a dental mirror, probe, scalers or curets are composed of

A. Handle
B. Shank
C. Working-End

Handle

The handle is where one would hold or grasp the instrument and there is usually a serrated to aid in gripping to optimise control of the instrument and reduce fatigue when working in the oral environment.

Shank

The Shank connects the handle to the working end and allows for adaptation of the working end to the tooth surface. It is also used to differentiate between instruments used for posterior (complex) and anterior (simple) teeth.


The shank is composed of the functional shank and lower or terminal shank. 
Functional shank : extends from working end to the bend before the handle
Terminal shank: extends from the working end to the first bend

Shanks can come in a variety of length. 
-Short
-Standard (A)
-Extended (B)

Shanks can also be simple (straight) or complex (bent). 
As a rule of thumb: Simple - Anterior teeth application 
                                         (left)
                                      Complex - Posterior teeth application
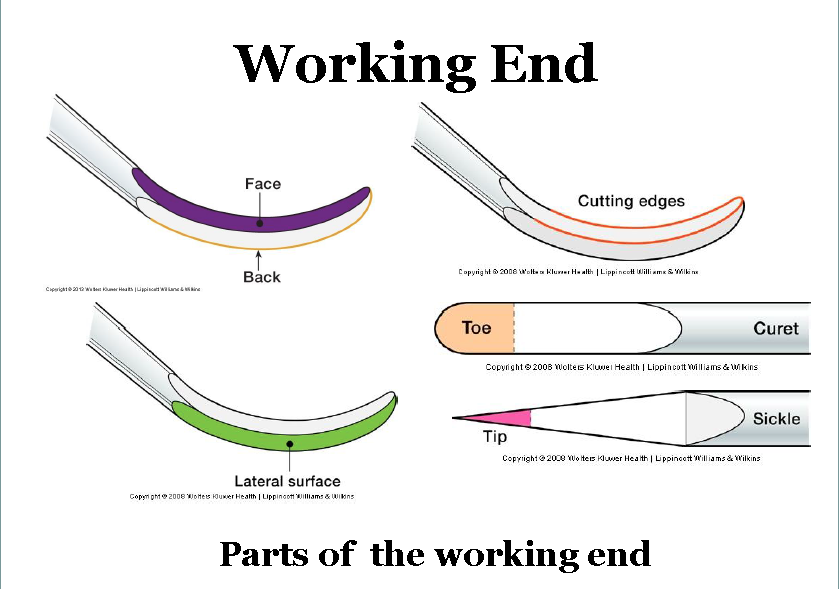
                                 (right)

Working End

The working end is what is in contact with the tooth surface and/or the portion of the instrument that does the work as it's name suggest.

The working end has a number of surface depending on the instrument. Most periodontal hand instruments such as sickle scalers and curettes have :

  1. Face
  2. Back
  3. Lateral Surface
  4. Cutting edges
  5. Tip or Toe
And the working end can be segmented into 3 parts
1) Toe/Tip
2) Middle
3) Heel


You see, the working tip/toe is used for kicking and you want this part to land on that chav's...
Courtesy of my lecturer, Dr C.Gonzales-Marin


The picture below shows the parts of the working ends of these specialised instruments. 


Here's another diagram because we <3 Diagrams! 


Sickle scalers will always have a tip which is sharp _ Curettes have toes which are rounded.

When using these instruments, we work with the first 1-2mm of the instrument.

Another way to differentiate between sickle scalers and curettes is by their cross section.


  1. Face the tip/toe of the instrument towards yourself
  2. Determine if the cross section is triangular or semi-circular

(If you require graphic aid, it's always wise to determine whether it is shaped like a toblerone chocolate or a kinder bueno)

If it's a toblerone -Sickle scaler


If it's like an inverted kinder bueno- Curette.


  • Toblerones Sickle scalers are for Supra-gingival scaling ONLY  
  • Kinder Buenos Curettes are for BOTH Supra and Sub-gingival scaling.


My point is that although both instruments have similar structure and looks, they can serve different purpose.

Tuesday, February 17, 2015

Types of Instruments


Classification of Periodontal instruments

*For our purpose, this classification of periodontal instruments is good enough despite the fact that we can diversify the umbrella even more into root surface planning instruments and surgical instruments but for simplicity sake, I'm going to include universal curettes under scaling instruments and not under a category of their own because... classification into 3 groups makes it a little easier for you to remember. 

Dental Mirrors

Dental Mirrors are iconic instruments of a dentist or dental healthcare professionals for that matter. When we see a dental mirror, we would intuitively think of the dentist and for the more informed, dental hygienists/therapists as well just like when we see a dental chair/burrs/probes.

Their function is primarily to provide vision in indirect vision situations as well as to reflect light onto the tooth surface where direct light does not reach. They are also used for retraction of oral anatomy.

The basic dental mirror is part of most dental kits.The "working end" of the dental mirror is the head which can come in various standard sizes.

  • Size 1 : 16mm
  • Size 2 : 18mm
  • Size 3 : 20mm
  • Size 4 : 22mm
  • Size 5 : 24mm
There are different types of mirrors for different situations
1) Flat surface - accurate sized images
2) Concave - magnified images produced
3) Double sided - for simultaneous retraction of lips/ cheeks and indirect vision

Probes
There are many different types of dental probes: Straight, william's WHO/BPE, Naber's, CPITN etc. And they can be classified into Explorer probes and Periodontal probes. 

  • Explorer probes: These can be either straight or curved and they possess a sharp end which aids in tactile feedback in detecting carious surfaces and irregular restoration margins. In a periodontal setting, curved probes such as the Naber's probe are commonly used to diagnose furcations and detect the presence of calculus on root surfaces. Straight explorer probes are generally used for diagnosing dental caries and irregular restoration margins. 
Straight Explorer Probe

Naber's probe
  • Periodontal Probes: There are many different types of periodontal probes but their main purpose is to measure to detect loss or gain of attachment of periodontal tissues.
The rationale behind measuring loss or gain of attachment is to assess the extent of periodontal disease and treatment effectiveness. To aid in this, Periodontal probes have different markings to indicate depth. 

So far in our Periodontology course, we have come across these 2 Periodontal Probes. 
  • WHO/BPE Probe (Basic Periodontal Examination)
    • Markings
      • 0.5mm 
      • 3.5-5.5mm
      • 5.5-8.5mm
      • 8.5-11.5mm
    • Used for BPE - screening
    • Assess calculus
    • Walking steps
    • align instrument parallel along the long axis of the tooth and go around the tooth


  • Williams Probe (6-point pocket chart)
    • Markings
      • 1 to 10mm
      • 4 & 6mm missing to aid reading
    • Used for 6 point pocket charting and full periodontal charting+Diagnostics

Scaling Instruments
Scaling instruments can be classified into manual and powered scaling instruments. I would consider root surface debridement instruments under scaling instruments for there is overlap of the usage.
For example, curettes and powered sonic/ultrasonic scalers are utilised for both supra-gingival and sub-gingival scaling. Here, I will run through the general characteristics and common types of scaling instruments.

Sickle scalers
  • Sickle scalers have working ends which contain tips. 
  • They can have complex or simple shanks 
  • Supra-gingival scaling only
  • Face of working end is @ a 90 degree angle to the lower shank

So the types of sickle scalers we have in our Barts Kit would be 
1) SE H6
2) SE H7

The SE H6 has a complex shank, (used for posterior teeth) Bended to the right when tip facing you


The SE H7 also has a complex shank (used for posterior teeth) bended to the left when tip facing you


Curettes
  • Curettes have working ends which contain toes 
  • They can have complex or simple shanks 
  • Supra-gingival + Sub-gingival scaling
  • Face of working end is @ a 90 degree angle to the lower shank
The curettes we have in our kits are
1) 2R/2L Columbia
2) 4R/4L Columbia
3) 13/14 Columbia

The 2R/2L and 4R/4L both have straight and complex terminal shanks respectively and can be used for both supra and sub-gingival debridement. The former is used for anterior teeth whereas the latter, posterior. 2R/2L has a longer terminal shank compared to the 4R/4L.


2R/2L
4R/4L


The 13/14 Columbia has a shortened complex terminal shank which is used for both supra and sub-gingival debridement and can be used for both posterior and anterior teeth. 


Columbia 13/14


Sunday, February 15, 2015

Concepts in periodontal scaling and how tos

1) clock positioning
2) select the correct instrument
3) determine correct working end and side
4) Technique & application

Clock positioning allows for optimum comfort, visibility and access. Patient should be reclined in the dental chair into a near horizontal position.

If you do not get good visual access and adaptation, a good troubleshoot would be to change your chair position. From my experience, this usually resolves the issue. Also, when adapting your instruments onto the tooth surface, you may need to change your chair position simultaneously at times as well.

The diagram above shows the recommended chair position for the respective working field in the patient's mouth. We usually imagine dividing the teeth by the midline when we scale

Anterior teeth - (divide into mesial and distal segments)
Posterior teeth - (divide into buccal and lingual/palatal segments)

So the clock positions for Anterior and Posterior would be as followed:

  • Anterior teeth segments that are facing you                                    8-10  O'clock
  • Anterior teeth segments that are facing away                                 11-1  O'clock


  • Posterior teeth with segments facing you/closer                                9     O'clock
  • Posterior teeth with segments facing away                                      10-11 O'clock


Selecting the appropriate instrument is important because you want to be efficient in removing calculus and plaque. And the correct instrument with the most suitable working end and making would allow you to do so.

1) decide if you require sub-gingival or supra-gingival scaling instruments. 
2) check if you have the most suitable shank length for posterior or anterior teeth
3) check the adaptation to determine if you can get the correction angulation whilst having the terminal shank close to parallel with the long axis of the tooth and that your shank and working end is not hugging the whole buccal or lingual surface of the tooth. You want it to be the former.

"adaptation, angulation and application of cutting edge. Repeat with me again. adaptation, angulation and application of cutting edge. Good. Repeat once more"

"adaptation, angulation and application of cutting edge"

These are the 3 concepts for supra-gingival debridement. For Sub-gingival debridement, there are additional steps in addition to these 3 key concepts.

Concept 1: Adaptation

We want to adapt the first 1-2mm of the tip/toe of the instruments to the tooth surface and not the whole face of the instrument


Concept 2: Angulation

Angulation for the sickle scaler should be from 70-80 degrees to the tooth surface. An angulation of 90 degrees would not only be less effective in debridement, it may hurt the patient and cause tissue injury. conversely, <70 degrees will cause burnishing of the calculus which will make further removal more difficult to detect and harder to attain the friction against calculus needed for removal. Angulation for root surface debridement is different! This will be discussed later. 


Concept 3: Application of instrument

For anterior debridement, we use an anterior sickle scaler. We apply one cutting edge to the segments towards the left of the midline and the other cutting edge to the segments towards the right of the midline. Remember to change your chair positioning to get better adaptation. Another thing you can do is to rotate the instruments around it's long axis using your fingers to get better adaptation. 


For posterior sickle scaling, there are 2 different working ends which has 2 different cutting edges. That makes 4 cutting edges in total and each cutting edge has a designated segment of a tooth. Similarly, chair positioning and rotation of instruments will be beneficial. 

Root surface Debridement


For Root surface Debridements, we use curettes. There are a few differences. Can you spot them? 

We first identify the correct working end. 
We do this by lowering the working end to the tooth surface and make a 70-80 degrees face to tooth angle. The terminal shank should be parallel to the long axis of the tooth and not hugging it like on the picture on the right. 


After determining the correct working end, we need to insert the instrument. We want to do this at a 0-40 degrees angulation. This is to prevent tissue damage and maintain the shape of the calculus first because we do not want to smoothen the surface of the calculus as we are inserting the instrument for this will make removal subgingivally even more difficult. Ideally, you want the face of the instrument at 0 degrees to the tooth surface. i.e. Face of the working end hugging the tooth surface.

To summarise this: 1)point the toe of the curette to the gingival margin
2) Position the working end so that the face hugs the tooth surface
3) Insert at ideally 0 degrees angulation into the periodontal pocket


The above picture shows that the insertion of the working end subgingivally. 


Next, you want to angulate once again to get the angulation for calculus removal. Tilt the instrument such that the lower shank is towards the facial surface. 
4) Position the working end under the calculus and 
Tilt the instrument towards the facial surface to establish 70-80 degrees angulation

One thing to note is that you will not see the working end subgingivally.
The solution is to use the angle of the terminal shank to help you gauge this. 

5) Stroke to remove calculus! whilst maintaining 70-80degree! 
Calculus should snap off
 The diagram above summarises the angulations for the different steps required in sub-gingival debridement.


Here's a demonstration by U-Mich on how to utilise a sickle scaler


And this one is on curettes.

HAVE FUN!